Basic User Interface Modules
The
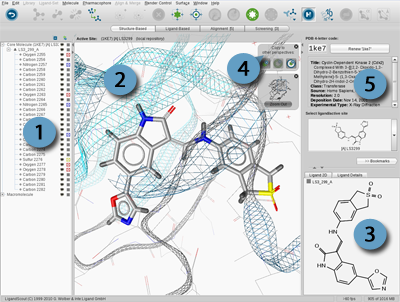
3D View
represents the most
important interaction of LigandScout. It is a powerful tool to
verify and revise structural data, which is crucial for the
automated generation of restrictive
pharmacophore
models
.
Since PDB data does not provide information on atom
hybridization states and bond types, LigandScout uses a
sophisticated ligand interpretation algorithm for the assignment of
bond types via molecular geometry analysis. Data quality of PDB
ligands is known to be an issue in molecular modeling. Therefore,
manual verification of the automatically deduced ligand structure
is highly recommended. Moreover, it represents a vital verification
step for the subsequent pharmacophore generation process.
Navigation Basics in 3D View
Position the mouse pointer in the
3D View
and press the
LEFT
mouse button to rotate the items shown in the 3D View.
Depending on your hardware setup, scrolling your mouse wheel
or pressing the
MIDDLE/WHEEL
mouse button and moving your mouse up/down
allows you to zoom. The structure can be translated by pressing the
RIGHT
mouse button while moving. A comprehensive
list of mouse controls
is provided in the
the section called “LigandScout Mouse Bindings”
.
Selecting Elements of the 3D Viewer
Select a single element by a single
LEFT
mouse click on it. Keeping SHIFT pressed
allows you to select consecutive elements,
CTRL (Command on MAC) pressed lets you select individual items. The
Select
command in the
menu picks all elements of ligand,
environment or pharmacophore.
Select All
is
identical to hotkey CTRL+A (Command+A on MAC) and picks all items at
once. Please refer to
Mouse
Bindings
for more details on mouse interactions.
Displaying Essential Information on Selected Items
The
Toggle Tooltips
feature in the toolbar provides relevant characteristics of the
currently selected item in a transparent frame adjacent to the
selection:
Atom types are changed quickly by selecting an atom and
pressing the character of the respective element in your keyboard
(this works for C, N, O, S, P). Apart from using these hotkeys, the
Change Atom Type
button in the toolbar gives you full access to the periodic
system, where you can pick the desired element.
Creating (New) Atom Bonds
To create a new bond between two atoms,
keep SHIFT pressed and select two atoms.
Then select the
Create New Bond
icon.
If you want to change a bond type, select the bond and press 1 (SINGLE), 2
(DOUBLE) or 3 (TRIPLE) on your keyboard to change the current bond
into the respective bond type. Additionally to these shortcuts, the
Change Bond Type
button in the tool bar provides this editing function.
Create a new atom by selecting a free hydrogen atom of a
ligand. Change the selected hydrogen atom to the atom of your
choice. This procedure automatically adds the new atom to the
ligand and roughly optimizes the structure in the neighborhood of
the added atom to avoid sterical clashes. You can use the hotkeys
CTRL+ALT+O (Command +ALT+O on MAC) to minimize the ligand
until a local minimum is reached. For
more information on this please see
the section called “Force Field: Minimization”
.
Deleting Atoms, Bonds, and Pharmacophore Features
Select an atom, bond, or pharmacophore feature you want to
delete and press the
DEL
button on your keyboard. The
Delete
button in the tool bar also provides this functionality. Multiple
selection is enabled for all elements; e.g. you can select various
atoms, bonds, and pharmacophore features for simultanous deletion.
See
the section called “LigandScout Mouse Bindings”
for additional
information on multiple selection.
Adding Distance/Angle Monitor
To measure the distance between two atoms, just keep SHIFT pressed
and select two atoms. Select the
in
the
menu or the
Add Distance Monitor
icon in the tool bar.
To measure the angle between three atoms, keep SHIFT pressed
and select three atoms. Select the
in
the same menu as above or the
Add Angle Monitor
icon.
To delete the distance or angle measurement, click
on the shown value and press the
Delete
icon.
To rotate a part of a molecule around a specific bond,
select its two neighbored bonds on either sides and press on the Angle Monitor
Add Angle Monitor
icon.
Select the angle value and keep the
LEFT
mouse pressed to rotate
the bond. To rotate a bond on the distant side of the molecule,
simply rotate the camera to bring the bond to the front.
Correct charges are crucial for the generation of valid
pharmacophore models. To adjust the charge of atoms, make a
selection and use the
Increase Charge
/
Decrease Charge
buttons or in the menu bar
>
command. Please note, that
Increase/Decrease Charge
functionality is only available on
high-resolution displays.
Defining Elements as Core or Environment
In special cases you may want to shift elements from core to
environment and vice versa. Just select the atoms and/or bonds you
want to move and use the
command located in the
menu. The respective buttons
Move to Environment
and
Move to Core
provide instant access to this LigandScout feature.
Returning to the Basic Structural Data
In LigandScout you can
recalculate bond valences, aromaticity, hydrogen
positions, and stereo chemistry from scratch via the menu
>
.
This feature is
useful if you lose track of your modifications. However, if you
only want to undo your last modification(s) you can use the
Undo
feature via the
Undo
button or in the menu
>
.
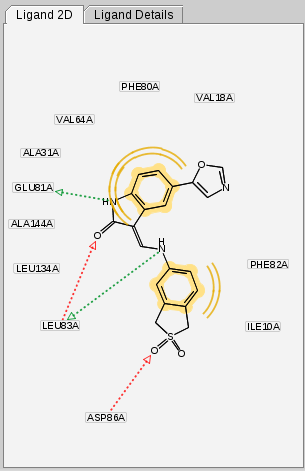
Advanced Render Control Settings
The
2D View
displays the structural
formula of ligands and its generated pharmacophore.
Like its 3D counterpart, the 2D View is used for fast
atom and bond type corrections. Furthermore, LigandScout now allows you
also to edit the pharmacophore features directly in the
2D View
in the same way as described for the
3D View
. Select one or several
pharmacophoric constraints by single click on the respective
residue identifier(s) located nearby the pharmacophore feature.
There are no major differences in handling between both tools.
Selections and manipulations are identical to that described for
the
3D View
. Both the 2D depiction of the
ligand and pharmacophore can be
exported in several file and graphics formats
.
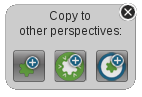
The Copyboard Widget gives the opportunity to transfer your chemical data
between different perspectives of LigandScout (Structure-Based Modeling, Ligand-Based Modeling, Alignment and Screening).
You can toggle this widget on/off in the menu
>
>
.
Molecules are added from one perspective to another using the
Copy current Ligand(s) to
icon.
Pharmacophores are added with the
Copy current Pharmacophore to
icon, respectively.
Exclusively active sites (binding pockets) can be transfered only from the
Structure-Based Modeling Perspective to the Bookmark View by clicking on the
Copy current binding site to
icon.
Please be reminded that you can add items to
the Bookmarks Panel only from the PDB View.
In other words, you have to switch to PDB View of the Structure-Based Modeling Perspective
to add the current molecule or pharmacophore to the Bookmarks Panel.
The items can be placed individually within the 3D View.
Some examples: If an active site is currently shown, this allows you to
add the ligand molecule to the Alignment Panel by clicking on the
icon
Copy current Ligand(s) to
Alignment Perspective.
If the pharmacophore was calculated you can add it
to the Screening Perspective by clicking on the icon
Copy current Pharmacophore to
Screening Perspective.
The transfered items can be placed individually within the
3D View
.
The following table gives an overview of the items that can be
exchanged between the perspectives.
|
From\To
|
PV
|
LBP
|
AP
|
SP
|
BV
|
|
PV
|
-
|
L, P
|
L, P
|
P
|
A
|
|
LBP
|
L, P
|
-
|
L, P
|
P
|
-
|
|
AP
|
L, P
|
L, P
|
-
|
P
|
-
|
|
SP
|
L, P
|
L, P
|
L, P
|
-
|
-
|
|
BV
|
L, P
|
L, P
|
L, P
|
P
|
-
|
Table 4.1. Exchanging data between perspectives:
ligand/s (L), pharmacophore/s (P), active site (A),
Structure-Based Modeling Perspective: PDB View (PV) and Bookmark View (BV); Ligand-Based Modeling Perspective (LBP),
Alignment Perspective (AP) and Screening Perspective (SP)
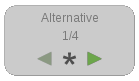
In case of navigating within your
molecule library, select more than one compound in the
Library View
and
the Alternatives Switcher automatically appears. The widget allows you to visualize the previous
(
Show Previous Compound
),
next (
Show Next Compound
) and
all (
Show All Compounds
) visible compound(s).
The Alternatives Switcher can be de/activated in the menu
>
.
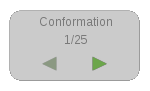
The Conformation Switcher navigates you through the conformations
of your selected compound. The widget automatically appears if conformations are
available and can be toggled in the menu
>
.
You can switch through available tautomers of a compound by using the
Tautomer Switcher. The widget can be toggled in the menu
>
.
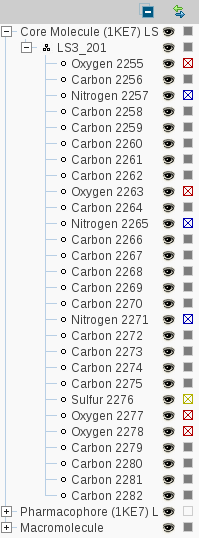
The
Hierarchy View
shows a tree diagramm of the current macromolecule-ligand complex as
you are used from various file commanders. A click on the '+' box on
the left of the branch title opens a sublevel. The
Collapse All
button lets you return to the starting view of this display. To
toggle the visibility of an element click on the
Toggle Visibility
icon. The
Change Color
icon allows you to change the element color.
Selecting Items with the Hierarchy View
A single
LEFT
mouse click
on a branch title selects all
elements of all subordinate levels. Keeping SHIFT pressed allows
you to select consecutive elements, CTRL pressed lets you select
and deselect individual items.
The
Link with Selection
icon
connects the selection in the 3D View to the
Hierarchy View. As you select items in the
3D View with this option enabled,
Hierarchy View opens all necessary sublevels
to focus and highlight the currently selected items.
The
Library View
allows you to
efficiently investigate collections of small organic molecules. It
is especially useful for the analysis of pharmacophore
screening and docking results.
Compound collections can be imported to the
Library View
using the
Open
or
command in the
menu. The LigandScout I/O framework
currently supports MDL SD, SMI, MOL2 and LDB file formats for loading
molecule libraries.
The
Open
command is used to display the
molecule exclusively in the
Library View
.
Select a file containing the molecules you want to analyze
with LigandScout and click
Open File
.
LigandScout now imports all ligands, activates the
Library View
and shows all properties
contained in the loaded library. Opening libraries with no
3D coordinates such as SMI files (or also SD(F) possible)
displays the compounds only in 2D.
The
Insert
command
(CTRL+I) can be used in two
ways: You can open a file containing an particular ligand and/or a
pharmacophore and then insert a library. The second possibility is
to load a PDB code and zoom into the binding site to insert the
library. The loaded data have to be in the correct coordinate frame
to yield a meaningful result. For instance, if the molecule to be
injected was docked into the active site before, this restriction
will be fulfilled. If the coordinate frame is not correct, the
inserted ligand will be placed into the coordinate frame of the
active site whether it makes sense or not.
Navigate in the Library View
In order to view compounds of your
collection, make a single click on a compound row of the library
to visualize it. To extend your selection, press CTRL and choose
additional compounds. The scroll bar on the right side lets you
navigate through your compound collection.
If you select more than one molecule in your library,
you can navigate within your selection and show the molecules one by one.
Thus, the
Alternatives Switcher
is automatically activated and you can switch to your previous, next or all
molecule(s). The widget can be toggled in the menu
>
.
In concordance to the handling within the
Hierarchy View
you
can also select several ligands for visualization.
The visibility of the library compounds can be toggled with the
Toggle Visibility
icon in the Hierarchy View.
According to a library insertion into a binding pocket,
the
original
ligand (core molecule) remains
visible (if existing) in the binding site unless it is erased or
defined
hidden
in
the
Hierarchy View
.
This is especially useful if you e.g. want to compare
your docking results to a binding pose of a known active compound.
If you add a molecule from another view to the PDB View,
a pop up dialog asks if you want to
Append to Library
,
Replace Core Molecule
or
Inject Only
. The latter one adds the
molecule only to the Hierarchy View.
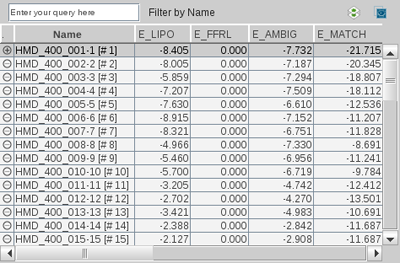
You can arrange the property columns of the
Library View individually by moving the column identifiers. Click
on a column identifier (e.g.
Name
) to sort the
table by this property. Another click on the same column identifier
flips the sort order. For instance you could sort your
docking/pharmacophore screening results by decreasing score. In
this way you can use LigandScout to investigate your virtual
screening results ranked by relevance.
To hide or show specific columns,
click on a column identifier using the RIGHT mouse button. A list
of available identifiers appears where you can enable or disable
columns by de/selecting their appropriate check box.
At the end of the list you can find further actions to control
the visibility of the columns.
Toggle Visibility
inverts the
column visibility.
Hide All
makes all columns invisible.
To get all columns back, click on the
Show All
item.
On the upper left corner of the
Library View LigandScout allows to apply filter criteria to the
compound table: Press CTRL and click on a column identifier to
select the parameter you want to use for filtering (default: Name).
Subsequently, click on the
Add Filter
label and a text box appears. When you enter a filter criterion,
the table will be updated instantly,
considering the currently applied criterion. To undo the filtering
erase the filter criterion in the text box.
Hide all compounds of the Library View with the
Hide All Compounds
icon located on the upper right corner of the
Library View
.
Next to this icon you find the
Align Molecules on Injection into the Binding Site
icon, which allows you to directly align the selected molecule(s)
to the active site by overlapping the feature tolerances.
Enabling
Align selection to Pharmacophore/Core Molecule
aligns and scores the selection to the context.
|