Searching in a large molecule collection for molecules possessing a specific
pharmacophoric pattern is the next step in drug design. LigandScout's Screening Perspective
provides the possibility to screen large molecule databases
against 3D pharmacophore models.
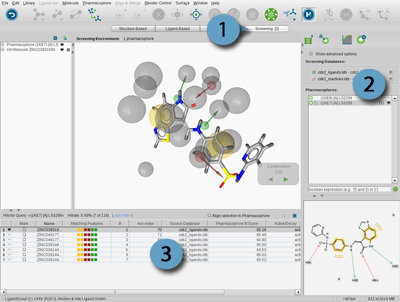
The Screening Perspective consists of a special control panel, the Screening Panel and the Library View.
The
Screening Panel
allows you to manage your molecule databases and pharmacophores.
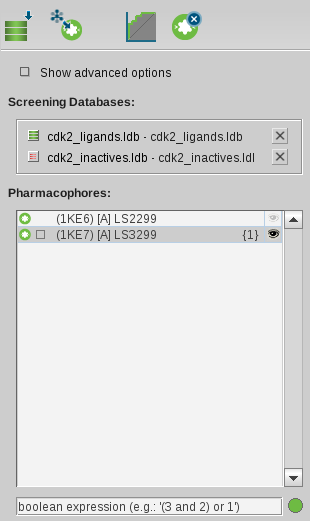
It contains an icon toolbar, the
Show Advanced Options Check Box
, the Molecule Database List and a Pharmacophore List.
Use the
Load Database
icon
to import a database (*.ldb) into the Molecule Database List or use the menu
>
.
A click on the
Perform Screening
icon
starts the screening process. To show the ROC curve (receiver operating characteristic)
press the
Plot ROC Curve
icon.
If the screening process has not started yet, the screening starts automatically
and after that the ROC curve is shown. Pharmacophores can be removed from the
Pharmacophore List by selecting them in the Pharmacophore List and then pressing the
Delete Pharmacophore
icon. To generate a new database
for screening use the
Create Screening Database
icon or via the menu
>
to specify your input/output database.
Show Advanced Options Check Box
To activate
Show Advanced Options
, click on the
check box. You can choose the
scoring function
(default: Pharmacophore-Fit),
the screening mode (default: Match all query features),
the retrieval mode (default: Stop after first matching conformation),
how many features of the pharmacophore should be omitted (default: 0)
and if excluded volume clashes should be checked during the screening process. Another precondition
for a hit is that the molecule has to match a minimum of three
features found in the pharmacophore model! If you use the Fragment screening mode, the minimum
number of required features can be modified (default: 3).
You can change these settings and the time-out per compound during the screening in the
Library Screening Settings
in the Preferences.
After importing a database through the
Load Database
icon
or the
>
, the database is added to the Molecule Database List.
For loading time reasons, the molecules in the databases are not shown in the 3D View.
To include a database, select the check box to the left of the
appropriate database name. The check box will be marked green which assigns
the database as active. Clicking again on this check box will mark this check box red, which
symbolizes that the database includes inactive compounds.
You can select more than one database but at least one needs to be marked as active.
To remove a database select the cross button to the right of your database
in the list. If you want to see the molecules in a database, simply switch to the Structure-Based Modeling Perspective and open
the database.
LigandScout allows one to screen a multitude of pharmacophores against multiple databases.
Import pharmacophores into the Pharmacophore List through
the menu
>
.
Optionally, you can copy them from other perspectives to the Screening Perspective by the
Copyboard Widget
.
For the screening process, make sure that at least one pharmacophore is
selected and visible in the Pharmacophore List. To remove a pharmacophore, select it and press the
Delete Pharmacophore
icon.
LigandScout provides the functionality to combine pharmacophores using boolean expressions
(“
AND
”/“
OR
”).
If you select more than one pharmacophore, the pharmacophores are consecutively numbered.
Define the combination of your pharmacophores in the query text box under the Pharmacophore List.
Setting the pharmacophore numbers in brackets groups the expressions and ensures the order.
The boolean expression will be automatically checked due to its operability. A red spot
shows an error in the expression. The green spot signalizes that the expression is ready to use.
For instance: “
(3 AND 2) OR 1
” means that a valid hit needs to be matched
to pharmacophore 3 and 2, or only to pharmacophore 1. If nothing is specified in the
query text box, the selected pharmacophores are connected by the “
OR
” expression.
After the screening process has finished, only
the matched molecules (so called hit results) appear
in the
Library View
. Information such as, name, number of conformations, and
geometric fit are shown per molecule in the hit Library View table. In the Library View you can
select the molecules one by one for further investigation, filter or
sort the table entries. You may also calculate additional properties for your
hit molecules by selecting the appropriate entry of the
menu.
For further information about the navigation in the Library View, please see
the section called “Library View”
.