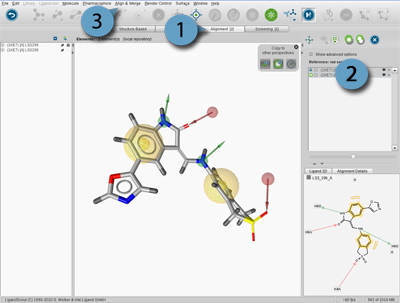
The purpose of the Alignment Perspective is to analyze common properties (features or reference points)
of pharmacophore models and/or small molecules by aligning them and generating shared or merged feature
pharmaocphores. Thus, the Alignment Panel and Alignment List help to manage your elements in
the Alignment Perspective.
The
Alignment Panel
allows you to align pharmacophores and/or molecules as well as
generate shared/merged feature pharmacophores.
Molecules and pharmacophores from other perspectives are added to the
Alignment Panel
using the
Copyboard Widget
or through the menu
>
>
.
The
Alignment Panel
consists of an icon toolbar, the
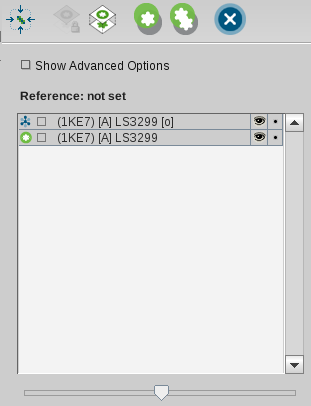
Show Advanced Options Check Box
,
the Alignment List containing molecules and pharmacophores, a
slider, and an RMS label.
Use
Center All Visible Structures
to move the center of all currently visible structures to one
point in 3D space. To set a reference element, perform a list selection on a
single element in the Alignment List and click
Set Reference
.
Clicking this icon again will reset a previously set reference
element. To perform an alignment, select two or more elements
from the Alignment List (
list selection
) and click the
Align Selected Elements
.
Similarly, to generate a shared feature pharmacophore select two
or more elements from the Alignment List and
click
Merge Pharmacophores and Interpolate Overlapping
Features
.
To remove elements from the Alignment List, perform a list
selection on the desired elements and click
Delete
icon.
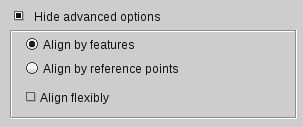
Show Advanced Options Check Box
Align by features
allows to align both ligands and pharmacophore
models by an algorithm examining the best possible pharmacophoric
feature overlay. If no reference element was specified one of the
selected elements will be chosen randomly.
Align by reference points
is a useful tool to investigate protein-ligand complexes of
structurally related targets. It allows for aligning ligands with
respect to the surrounding protein residues. In this way the user is
able to directly compare the absolute position of one or several
ligands within the aligned binding site.
If you want to include available conformations in the
alignment process, enable the
Align flexibly
check box.
Molecules are represented by the
Molecule
icon and pharmacophores are represented by the
Pharmacophore
icon.
Molecules and pharmacophores can be accessed (and selected
for alignment) by clicking on their names in the Alignment List.
You can also select several elements next to each other by
locating the mouse pointer on a single element, pressing
the
LEFT
mouse button and dragging
over the areas you wish to select. This
list selection
will be highlighted in the associated lines. To
select an element click on the
Unselected
icon and to deselect this element again click on the
Selected
icon in the appropriate line. This special selection allows for a
coordinate-transforming rotation and translation
in the 3D Viewer: Select a ligand in the 3D View and
press ALT+SHIFT+LEFT mouse button for rotating and ALT+SHIFT+RIGHT mouse button for translating
(Command+Option on MAC). These special transformations
can be used to manually align a structure to another one or to separate two aligned ligands for
instance.
The
menu extends the set of available user
interactions by providing additional features for handling elements
in the Alignment List. Select an element in the Alignment List and press the
RIGHT
mouse button
to open the
menu.
The slider and the RMS label will stay inactive if an
alignment was performed for three or more elements or if there was
a perfect alignment (which is the case for a molecule aligned to
its pharmacophore or for two instances of the same structure). If
there were exactly two elements to be aligned which did not show a
perfect alignment, the slider as well as the RMS label will become
active and will give more information of the currently shown
alignment. Use the slider to iterate over the alignments. The
alignments are sorted according to a score, the best ones will be
at the beginning, whereas values reflecting poor alignments
will be at the end of the
slider range. The RMS label gives the RMS (root mean
squared) of the position deviances of all valid feature matchings.
The number in brackets represents the number of valid feature
matchings.
To use the render options, select in the menu bar
>
.
Use Blur (SDOF: Semantic Depth of Field)
allows advanced blurring of objects. The effect is only visible if
the
corresponding
check box
of ligands/pharmacophores in the Alignment Panel
is activated. Blurring may cause graphical issues or slow down the
performance on low end computer systems and is therefore
recommended only with suitable hardware equipment.
Show
Reference Points
allows to visualize the position of the
protein residues when using
alignments based
on reference points
.
Show Reference Point
Names
places residue identifiers to this reference
points.
Show Feature Tethers
visualizes the
affiliation of corresponding pharmacophoric features with tethers.
Show Reference Point Tethers
visualizes the
affiliation of corresponding protein reference points with
tethers.