
LigandScout supports feature-based alignments of
pharmacophores and molecules in arbitrary combinations. Alignments
are always performed pairwise no matter how many elements are to be
aligned. Therefore, it is necessary to mark one structure as a
reference element.
In case the user did not specify a reference
element explicitly, LigandScout will automatically choose one
element from the set of selected elements. All other selected
elements will be aligned to this
reference element
.
A single alignment is based on matched chemical features
(feature pairs) where one feature must be the reference
element's feature set and the other must be from the feature set of
the element to be aligned to the reference element. For
pharmacophores these chemical features are given explicitly.
However, for molecules these features have to be derived during the
alignment algorithm and for the sake of clarity these are not
visible to the user.
There are various ways to adjust the alignment algorithm.
Please have a look at
the section called “Alignment Settings”
for details. We refer to the
Copyboard Widget
for more information on how to add pharmacophores and molecules to
the Alignment List. Possible interactions in the Alignment Perspective are
discussed in the
the section called “Alignment Panel”
.
You can set a reference element prior to perform the
alignment by selecting one element in the Alignment List and
clicking the
Set Reference
icon.
Please note that setting a reference element is to be seen as a
hint to the alignment algorithm. If the reference element was set
and the reference element is also part of the selected elements to be
aligned, this reference element will be used during alignment. In
all other cases (no reference element set, reference element set
but not contained in the selected elements) an arbitrary reference
element will be chosen automatically.
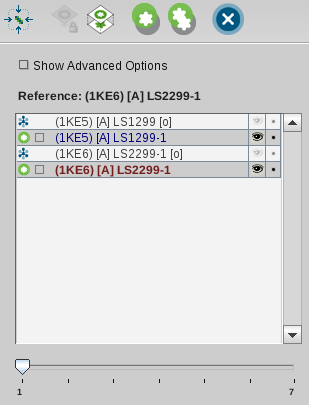
All elements which will be selected in the Alignment List
will be aligned to a reference element. This reference element can
be set by the user or will be chosen automatically as described
above. To perform an alignment, select two or more elements in the
Alignment List. This should look like the following image where
pharmacophores of ligands of complexes 1ke5 and 1ke6 were selected
and 1ke6 was set to be the reference element.

After clicking the icon
Align Selected Elements
LigandScout will calculate one or several alignments and present
them to the user as illustrated in the image below. The activated slider
indicates that there are several alignments available. Information about
each alignment are found in the
Alignment Details View
, e.g.,
the associated RMS (root mean squared) value of the
valid matched feature deviances is shown as well as the number of
valid matched features.
There are cases where LigandScout will provide just a
single alignment:
-
Three or more elements will be aligned to each other
-
A perfect alignment was found (usually a molecule to its own pharmacophore, or aligning two instances of the same structure)
LigandScout supports alignments of pharmacophores
and molecules with respect to the protein environment. This is a
useful feature to investigate protein-ligand complexes of
structurally related targets but also to generate shared feature
pharmacophores. In this way the user is able to directly compare the
absolute position of one or several ligands within the aligned
binding site. For this approach, the investigated proteins
structures have to show a certain degree of similarity, in order to
achieve a meaningful structural alignment.
First, check the
Show Advanced Options Box
in the
Alignment Perspective
. LigandScout now offers
both alignment modes: The
Feature-Based Alignment
mode and the
Reference Points-Based Alignment
mode. Activate the latter one and select the pharmacophore and/or
molecules you want to align. Clicking onto the icon
Align Selected Elements
calculates the aligment of these elements with respect to their
protein environment. In other words, LigandScout aligns the protein
residues (which is by default not visible in the Alignment Perspective) of
all selected elements in order to overlay the pharmacophores and
molecules according to their position in the binding sites.
You can visualize the
protein alignment by toggling on the reference points in the Hierarchy View
or select in the menu
Render Control
>
Show Reference Points
in the Alignment Perspective. The
protein residues will thereby be illustrated as small circles. In
the same menu,
Render Control
>
Show Reference Point Names
allows you to place the residue identifiers on these reference points.
Show Reference Point Tethers
visualizes the affiliation of corresponding protein reference points
with tethers.